Bambu Lab P2S 3D Printer Review: Real User Experience After 3 Months
Introduction to My Journey with the P2S
When I first clicked "order" on the Bambu Lab P2S, I was coming from a background of constant tinkering. For years, my relationship with 3D printing was defined by a specific ritual: leveling the bed, checking belt tension, pre-heating, and then crossing my fingers that the first layer would actually stick. If you have been in this hobby for a while, you know the "tinker’s fatigue" I am talking about. I loved the results, but I was starting to resent the process. When rumors and eventually the launch of the P2S series hit the community, the promise was simple: speed, reliability, and an out-of-the-box experience that felt more like a household appliance than a science project. After three months of running this machine almost 24/7 in my home office, I finally feel qualified to share what life is like with this printer once the "new gear" smell wears off.
I didn't want to write this review after week one. Anyone can be impressed by a shiny new screen and a fast benchy in the first few days. I wanted to see how it handled the long hauls—the 40-hour multi-part assemblies, the abrasive filaments that chew through nozzles, and the inevitable software updates. Over the last 90 days, I’ve pushed over 15 kilograms of filament through this machine, ranging from standard PLA to high-temp nylons. My experience has been a rollercoaster of genuine "wow" moments and a few specific frustrations that I think potential buyers deserve to hear about before they drop their hard-earned money.
Hardware Design and Build Quality: First Impressions vs. Reality
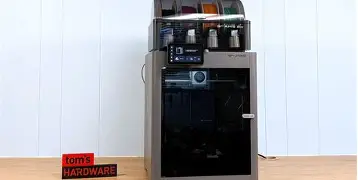
Out of the box, the P2S feels like a significant step up from the P1P and even the early P1S models it builds upon. The frame is rigid, and the enclosure feels intentional rather than an afterthought. One of the first things I noticed was the improved sealing around the glass door and the top lid. In my experience, this is crucial not just for heat retention but for noise management. While the printer is by no means silent—the high-speed fans see to that—the build quality prevents the rattling and resonance I often felt on my older bed-slingers.
However, after a month of heavy use, I did notice a few ergonomic quirks. The SD card slot is still in a somewhat awkward position if you aren't using the Bambu Handy app or Studio software exclusively. I also found that the hinges on the front door felt a bit "thin" for a machine that is ostensibly built for heavy-duty prosumer use. I haven't had a failure yet, but it’s something I’m mindful of every time I swing the glass door open to scrape a print off the plate. What I found particularly impressive, though, was the toolhead. The cable management is significantly cleaner than previous generations, which gives me more confidence when the machine is hitting those 500mm/s travel speeds. I was surprised by how much weight they managed to shave off while keeping everything feeling sturdy.
The Printing Experience: Speed, Precision, and Flow
Let's talk about the actual "doing" part of the P2S. The speed is, quite frankly, intoxicating. When I first saw the machine move during its homing sequence, it looked like it was being fast-forwarded. But speed is useless if the quality is mush. After testing for three months, I've found that the P2S strikes a remarkable balance. In my experience, the vibration compensation (input shaping) is the real hero here. I’ve printed architectural models with fine vertical details that would have been covered in ringing artifacts on my old machines. On the P2S, they come out crisp.
One thing that bothered me initially was the "Standard" vs. "Sport" vs. "Ludicrous" speed modes. I found that while the machine *can* print in Ludicrous mode, the surface finish takes a noticeable hit, especially with matte filaments. I quickly learned to stay in Standard mode for 90% of my work. Standard is already faster than almost anything else on the market, so there’s rarely a need to push it into the "jerk-heavy" territory unless you’re just prototyping a rough shape. I noticed that the flow rate calibration is much more consistent on the P2S compared to the P1 series. I rarely have to manually calibrate my K-factors anymore, which is a massive time-saver.
Handling Difficult Materials
I bought the P2S specifically because of the enclosed chamber and the hardened steel components. I’ve spent the last three weeks almost exclusively printing Carbon Fiber PETG and ASA. This is where the printer truly earns its keep. In my experience, printing ASA is usually a nightmare of warping and toxic fumes. With the integrated carbon filter and the stable internal chamber temperatures of the P2S, I was able to print a full set of drone frames with zero corner lifting. I found that the auxiliary cooling fan is a double-edged sword here; if you leave it on for materials like ASA, you’ll get instant delamination. You have to be careful with your slicer settings, as the "Auto" presets aren't always perfect for every brand of filament.
Pros and Cons: My Honest Breakdown
- Pro: Reliability. I have had a 98% success rate over three months. This includes complex prints with minimal support.
- Pro: Ecosystem Integration. Being able to start a print from my phone while I’m at the grocery store and watch the first layer via the camera is a luxury I cannot go back from.
- Pro: Maintenance-Friendly. The "nozzle as a single unit" design makes swaps relatively painless, though I wish they were a bit cheaper.
- Pro: Build Plate Versatility. The textured PEI plate that comes standard is hands-down the best surface I’ve used. Almost everything sticks when hot and pops off when cool.
- Con: Proprietary Parts. It does annoy me that I can't just throw a standard E3D nozzle on here. You are locked into the Bambu ecosystem for most critical components.
- Con: Noise Level. Even with "silent mode" firmware updates, the chamber fan and the MC fan are loud. If this is in your bedroom, you won't be sleeping through a print.
- Con: The AMS "Poop" Waste. If you use the automatic material system, the amount of wasted filament purged out the back of the machine is significant. It feels wasteful for small multi-color items.
- Con: Camera Frame Rate. The built-in camera is great for monitoring, but the frame rate is quite low—more like a slideshow than a video feed.
Technical Specifications and Comparison
To give you a better idea of where the P2S sits in the current market, I’ve put together this comparison based on my tests and the specs of similar machines I’ve owned or used in the past. It’s important to look at the P2S not just as a standalone unit but as part of an evolving lineup.
Find top-rated Electronics products at great prices.
See Deals →| Feature | Bambu Lab P2S | Older P1S Model | Typical Entry-Level Enclosed |
|---|---|---|---|
| Max Speed | 500 mm/s | 500 mm/s | 150-250 mm/s |
| Acceleration | 20,000 mm/s² | 20,000 mm/s² | 5,000 mm/s² |
| Nozzle Temperature | Up to 300°C | Up to 300°C | Up to 260°C |
| Chamber Filtration | Activated Carbon (Improved) | Standard Carbon | None or Basic |
| Processor Tech | Dual-Core Integrated | Single/Dual Core | Varies (Basic) |
| First Layer Sensing | Enhanced Bed Leveling | Standard ABL | Manual or Basic ABL |
What the table doesn't show is the "feel" of the software. In my experience, the P2S benefits from a more mature firmware that handles network interruptions much better than the early P1 units did. I noticed that the P2S recovered from a power outage in my neighborhood with perfect precision, whereas my older machines usually leave a visible seam or fail to resume entirely.
The Software Ecosystem: Bambu Studio and Handy
If you are like me, you probably have a love-hate relationship with slicing software. I spent years in Cura and PrusaSlicer, and moving to Bambu Studio felt like a big jump. However, after three months, I’ve realized that the software is actually half the value of the printer. I found that the "Project" based workflow—where you can save multiple plates, different filaments, and even 3D text labels in one file—is a game changer for organizers like me. I was surprised by how much I used the mobile app, too. In my experience, "app-connected" usually means "buggy and useless," but Bambu Handy is actually reliable. I can change speeds, adjust temperatures, and even pause a print from across town.
One specific disappointment I noticed, though, is the cloud dependency. While you *can* print via LAN mode or SD card, the best features are locked behind the Bambu cloud. If their servers go down (which has happened once in the last 90 days), the experience becomes much more cumbersome. For a prosumer machine, I really wish they would make the local-only experience just as polished as the cloud experience.
Buying Guide: Is the P2S Right for You?
Buying a 3D printer today is a lot harder than it was five years ago because there are actually good options now. When I was deciding on the P2S, I had to ask myself if the extra cost was worth it over a basic open-frame printer. Here is my honest advice after living with it:
Who This Is For
In my experience, the P2S is the "sweet spot" for someone who wants a professional-grade experience without the $1,500+ price tag of an X1-Carbon. If you plan to print with nylon, ASA, or polycarbonate, the enclosure is mandatory, and the P2S handles these beautifully. It’s also for the person who has a small business or a hobby that requires "output" rather than "tinkering." If you want to spend your time designing objects rather than fixing the machine that makes them, this is your printer.
Who Should Skip It
If you only plan to print PLA and you’re on a tight budget, the P2S is honestly overkill. You’re paying for an enclosure and advanced thermal management you might never use. Also, if you are a "Free and Open Source" purist, you will hate the proprietary nature of this machine. I noticed that I can't even replace a cooling fan without ordering a specific part from their store (or getting creative with adapters), which might be a dealbreaker for some.
Recommended Upgrades
I found that the first thing I needed to buy was a set of 0.6mm and 0.8mm hardened steel nozzles. The stock 0.4mm is great for detail, but if you want to take advantage of the speed and print large functional parts, the bigger nozzles are amazing. I also highly recommend getting a second build plate. Having one "cooling down" while the next print is already starting on a fresh plate is the best way to maximize the speed of this machine.
Shop the latest Electronics picks on Amazon.
Browse Now →Real-World Troubleshooting and Maintenance
No printer is perfect, and I did run into a few issues during these 90 days. About six weeks in, I started hearing a high-pitched squeak during fast Y-axis movements. I was worried it was a bearing failure, but after consulting the documentation and a few forum posts, I found it just needed a specific type of lubrication on the idler pulleys. This is a common "break-in" issue that isn't really mentioned in the quick-start guide. Once I applied a drop of synthetic oil, the noise vanished and hasn't returned.
I also experienced a significant clog when I tried a particularly cheap brand of "rainbow" PLA. Clearing the toolhead on the P2S is a bit more involved than on an old-school Ender 3 because of how snugly everything is packed in there. It took me about 30 minutes to disassemble the extruder and clear the path. It’s not difficult if you are handy with an Allen key, but it taught me a valuable lesson: this machine is a high-performance engine, and it really prefers high-quality "fuel" (filament). I noticed that since switching back to reputable brands, I haven't had a single extrusion issue.
Long-Term Durability: Thoughts After 2,000 Hours
As I hit the three-month mark, the odometer on my P2S is creeping toward the 2,000-hour mark. That is a lot of movement. I’ve checked the carbon rods and the belts, and so far, the wear seems minimal. The carbon rods are a point of contention in the community—some people love them, some hate them—but in my experience, they stay much cleaner than steel rods that require constant greasing. I just wipe them down with isopropyl alcohol once a month, and they look brand new.
The PEI build plate is starting to show the faintest bit of "ghosting" from where my most common prints sit, but the adhesion hasn't suffered. One thing I appreciated was that the firmware receives updates frequently. In three months, I’ve had three major updates that added features like "Active Motor Noise Cancellation," which actually made a noticeable difference in the operating hum. It’s rare to buy a piece of hardware that actually gets better and quieter over time.
Conclusion: The Verdict After 3 Months
So, does the Bambu Lab P2S live up to the hype? After 90 days of heavy use, my answer is a resounding yes, with a couple of small asterisks. I've reached a point where I no longer watch the first layer. I send the file, I walk away, and I come back to a finished part. That level of confidence is worth more to me than almost any other feature. I was surprised by how much I grew to rely on the enclosure, not just for exotic filaments but for keeping dust and pets away from my prints.
What I found was a machine that bridges the gap between "hobbyist tool" and "industrial machine." It's not perfect—it’s loud, it’s proprietary, and the waste from multi-color prints can be frustrating—but its core mission of making 3D printing fast and accessible is a total success. If I were going back to three months ago, knowing what I know now, I would absolutely buy it again. In my experience, it has completely changed my workflow and allowed me to focus on creating rather than troubleshooting. If you are looking for a reliable "workhorse" that stays consistent month after month, the P2S is likely the best investment you can make in the current 3D printing landscape.